LEMP Stack (Linux, Nginx, MySQL, PHP) and PHPMyAdmin (via SSH-Tunnel) under Debian Wheezy
Nginx is also sometimes poetically called as the “unsinkable Webserver”. Thanks to the thread pool it can serve many concurrent TCP connections (even very slow ones from smartphones) using minimal system resources.
MySQL is a powerful RDBMS (Relational Database Management System) and is available for free. It is the basis of prominent web applications such as WordPress or Joomla.
While writing this article the individual steps on a Rackhansa VPS (Virtual Private Server) were tested. These instructions will work on any default installation of Debian Wheezy.
1. OS Update
First update your operating system so that all security updates can be installed:
apt-get update && apt-get upgrade
2. Installation MySQL Server
The installation of MySQL is very easy with:
apt-get install mysql-server
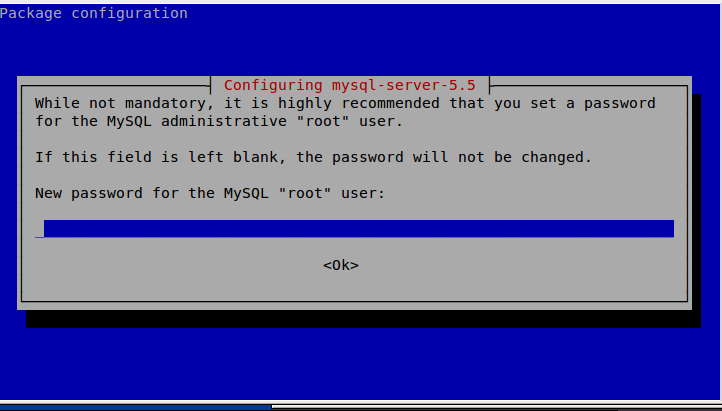
During the installation, You are asked for setting the root password of your MySQL server as it can be seen in the picture below.
Some additional settings:
 # Initialize system tables
mysql_install_db

# Secure your mySQL instance
/usr/bin/mysql_secure_installation
3. Installation NGINX
Just one command:
apt-get install nginx
With each change of the nginx configuration files You can use the following command to restart the nginx web server. Because nginx will not start automatically after installation, restart it.
service nginx restart
Test: With ifconfig You can display the address of your vServer. Check the URL http://my-ip-address/ with a browser (or make sure that your DNS settings are correct and use http://www.meine-domain.de/ instead of an IP-address) and You will be greeted with the following message:
Welcome to nginx!
Configure nginx for the cooperation with php5-fpm:
Edit the file /etc/nginx/sites-enabled/default, after that restart nginx.
 # find the line
server_name localhost;

# and assign the hostname of your website:
server_name www.meine-domain.tld;

# find the line
index index.html index.htm;

# edit it to allow PHP-processing:
index index.html index.htm index.php;

# Edit the block PHP-processing:
        location ~ .php$ {
                fastcgi_split_path_info ^(.+.php)(/.+)$;
        #       # NOTE: You should have "cgi.fix_pathinfo = 0;" in php.ini
        #
        #       # With php5-cgi alone:
        #       fastcgi_pass 127.0.0.1:9000;
        #       # With php5-fpm:
                fastcgi_pass unix:/var/run/php5-fpm.sock;
                fastcgi_index index.php;
                include fastcgi_params;
        }
Nginx needs to be restarted:
service nginx restart
4. PHP
For php5-fpm only a few packages have to be specified, the rest is controlled by dependencies:
apt-get install php5-fpm php5-mysql
Configuration: cgi.fix_pathinfo is set by default to 1. This may lead to a security breach. For help, see the comments in the configuration file php.ini. Edit the file with “nano /etc/php5/fpm/php.ini and look for the line with cgi.fix_pathinfo and change it as follows:
cgi.fix_pathinfo=0
Under Debian php5-fpm is already configured with the fast Unix Socket /var/run/php5-fpm.sock. Just php5-fpm has to be started:
service php5-fpm restart
PHP-Info Page
Edit a new file: nano /usr/share/nginx/www/info.php with the following content:
<?php phpinfo(); ?>
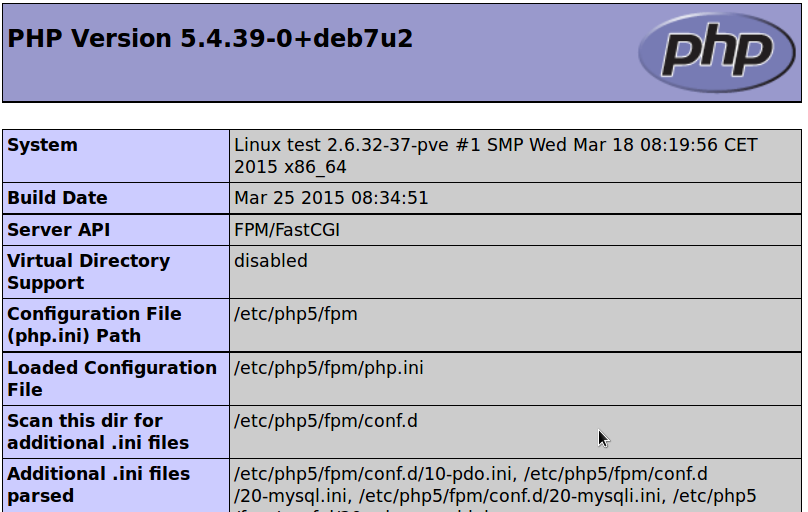
Test: Browse your URL http://my-ip-address/info.php. The output of info.php should look like this:
5. PHPMyAdmin
It’s just nice to be able to manage your database server with a graphical user interface. Below phpMyAdmin is installed so that You only can access it on localhost and your database is protected from attacks from the Internet. For an occasional access to your database, building a SSH tunnel is much more convenient than fiddling with SQL commands.
The main advantage of using SSH tunnel is that it can be setup quickly and provides less target for hackers than any web application (secure passwords assumed).
First, we perform the installation with a standard configuration for apache2 so PHPMyAdmin can create the necessary MySQL tables.
 apt-get install phpmyadmin

# Accept configuration for apache2, set SQL-root password  and answer all question with Yes
Now we create a configuration file for nginx phpmyadmin, edit the new web server configuration with nano /etc/nginx/sites-available/phpmyadmin and fill it with the following contents: :
 server {
        listen       localhost:8000;
        server_name  localhost;

        root         /usr/share/phpmyadmin;
        index        index.php;

        location ~ .php$ {
                fastcgi_split_path_info ^(.+.php)(/.+)$;
                fastcgi_pass unix:/var/run/php5-fpm.sock;
                fastcgi_index index.php;
                include fastcgi_params;
        }
}
Thereby the line listen localhost:8000 means that this site cannot be reached on the internet. Enable this new configuration with the following commands:
 cd /etc/nginx/sites-enabled/
ln -s ../sites-available/phpmyadmin .
service nginx restart
SSH-Tunnel with the commands below:
 # create a new user and assign a strong password
useradd -m test
passwd test

# We assume a Linux Desktop, in case of Windows e.g. putty can be used to create an SSH-tunnel.
# Replace www.my-domain.tld with your real hostname!
ssh -fCN test@www.my-domain.tld  -L 8000:localhost:8000

# -f :  ssh runs as background process
# -N : do not execute remote command
# -C : data compression
# 8000:localhost:8000 means that remote port 8000 connected to localhost:8000
Your PHPMyAdmin URL: http://localhost:8000/
Your server is now ready for real applications.
WAF (Web Application Firewall)
WAF provides advanced protection for web applications. This subject is treated in a separate article.


